
I’ve been using Philips Hue bulbs for a long time, but I was looking for an alternative since these are very expensive. I found that Ledvance (formerly Osram) offers several lines of RGB bulbs. They come in 3 flavors: Wi Fi, Matter, and ZigBee.
While I would go for Zigbee as my first choice (they are definitely NOT internet-connected and never will be), these aren’t available in my country. The second best option would be Matter, which is an open standard that always offers a local-only mode.
The only option available here is the SMART+ version, pictured here
They come in a grey box and say “SMART+”. This means they’re Wi-Fi and run only with the Ledvance app.
The cloud
Ledvance doesn’t provide their own cloud. Instead, they leverage Tuya’s cloud for control. The app works in a mix of local, when it can reach the bulb, and cloud, when it can’t.
This is bad and good news. It’s bad news because it means the bulb doesn’t expose an API we can easily control, but it’s good because… at least it exposes an API. But this API isn’t directly supported by Home Assistant. Here’s how you can set it up using “Local Tuya” as an alternative.
Provisioning
First, you’ll (unfortunately) need to provision the bulb via the Osram app. There is no other way to do this since the bulbs don’t have a QR code or any other way. The bulbs need the app to “call home” and fetch a “secret”.
So set up the app, create the account, and add the bulb as usual. You’ll need your username and password for the following step. Lucky, it uses regular username/pass authentication and no 2FA or OAuth shenanigans.
Fetching the key
In a Tuya network, every device gets assigned a secret key once it’s provisioned by the cloud. This isn’t something you can see in the app, but it’s sent to the app for local control anyways. There are several ways to do this, some of which involve rooting a phone, android emulators, developer mode, or debugging. I’m just using this script which does it all from a computer.
I’m using Python 3.11 to run it and it works fine. The steps to set it up are the usual Python script deployment steps: Create a venv, pip install, activate, and run.
git clone https://github.com/FlagX/ha-ledvance-tuya-resync-localkey
cd ha-ledvance-tuya-resync-localkey
python3 -m venv venv
source venv/bin/activate
pip install -r requirements.txt
python print-local-keys.py
If you’re on Windows, you need to use venv\bin\activate.bat instead.
When you run the script, it’ll ask you for your username and password for the app. It’s up to you to decide if you trust this script…. but anyways, once you do this, it’ll give you a list of all the available devices, their ID, and their key, like this:
device name:    LDV SMART+ EDISON 6W RGBW
device id:      bfaba27ce1d00f4xxxxxxx
local key:      (m6|!exX5xxxxxxx
Obvioulsy, they will all be different for you. These will also change every time you reset your devices so keep this in mind.
Integrating to HA
We need to integrate into Home Assistant. There is a LocalTuya repo, but it’s been abandoned by the developer a long time ago. Instead, I used this fork which seems to work well.
In order to install it, you need to add it as a “custom component” in Home Assistant. I run HA as a “Core” install so these instructions apply only to me. You’ll need to figure out how you integrate it in your case.
Here are the steps I ran:
git clone https://github.com/xZetsubou/hass-localtuya
cd hass-localtuya
cp -R custom_components/localtuya /path/to/your/ha/install/custom_components/localtuya
For updates you’ll probably need to (untested):
cd hass-localtuya
git pull
rm -Rf /path/to/your/ha/install/custom_components/localtuya
cp -R custom_components/localtuya /path/to/your/ha/install/custom_components/localtuya
in both cases you’ll need to restart Home Assistant afterwards.
HA Setup
Once Home Assistant restarts (it’ll take a bit since it’ll be installing all the pip requirements for this package), you need to set it up as any other integration
- go to Settings, Devices and Services, add integration (blue button, bottom right).
- search for Local Tuya. it’ll have a yellow icon that warns you this is a custom integration, it’s fine.
- It’ll ask you for Cloud API credentials1. Just click the “Disable Cloud API” check, and hit Submit.
- Go to the Local Tuya integration, and click CONFIGURE
- Select Add new Device. It will auto-detect the device since it broadcasts its presence.
- Enter the device name (just for your reference), the IP should be automatically detected, and then enter the Local Key we fetched before, and click submit
- Here is the tricky part: we need to set up the bulb. This is normally done via API. The integration can fetch the info from the cloud, but this isn’t available to us. I was able to, somehow, get it to run. Here is a screenshot of the mappings (this is the “Reconfigure” option as mine is already added, read the paragraph after the image too)
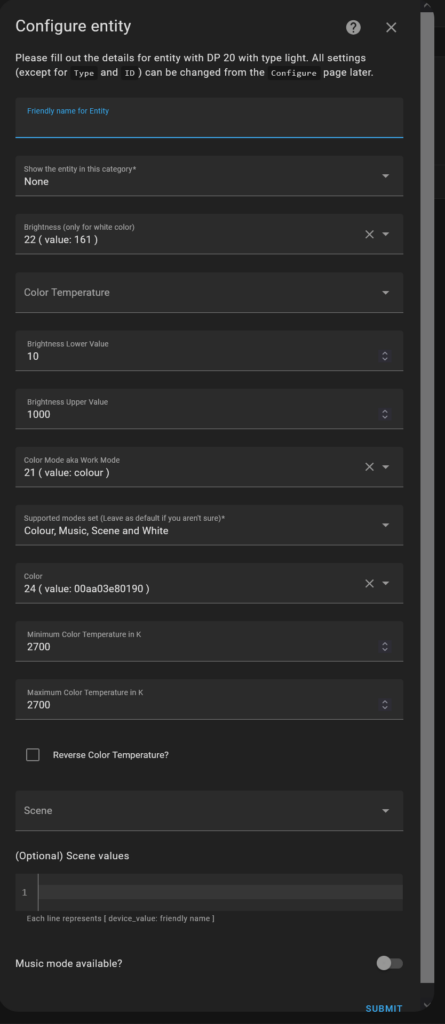
I’m showing the “reconfigure” screens, so I already have two important settings already configured: Type, which is easy: it’s a light. But also, you need the ID. This took me a while. ID is not the bulb’s ID, it’s actually the on/off state for the light. In this particular bulb, the field 20 is a boolean, and it represents the state of the bulb.
The other fields are mapped like you see in the screen. Notice the Color Temperature is set to min 2700/max 2700. This is because this bulb is warm white only.
Once you hit submit, you’ll go back to the integration list. You’ll see the localtuya integration now has 1 device and 1 entity. Click on 1 device, and you’ll be redirected to your only bulb. Now try turning it on and off! If all went well, you’ll be able to switch it on and off. If you click on the lightbulb, you can change from White to Color, and change the colors too.

If you have the Ledvance app, you’ll see it change if you change anything in HA. And you’ll see HA refresh too, when you change it from the app. Neat.
Things to consider
It’s unfortunate that we need the cloud to get access to our devices. I understand this simplifies the setup but it also means that if the Ledvance cloud stops working one day, your bulbs will be stuck to your configured SSID forever. If you remove them (you probably won’t be able to as the app will most likely refuse to work by then), you won’t be able to add them back.
I’m not aware of alternative apps that can provision the devices locally. The Local Tuya integration only talks to the devices locally instead of doing it via the cloud, but it can’t provision new devices.
You can also airgap your devices (cut internet access to them via firewall rules). This should in theory work. The bulb will try to contact the cloud but you can still manage it locally. But I suspect that, if the cloud doesn’t see the devices periodically, it’ll consider them as dead, and remove them from your account.
Same as your account: if you don’t have the Ledvance app running periodically in your phone, you’ll most likely lose your account after a few months for inactivity. This is pure speculation on my part, but it’s possible.
Conclusion
This has been an interesting adventure. I don’t recommend these lights. Instead, I recommend to stick to Zigbee whenever possible. Zigbee is a little more expensive and you need a coordinator, but you’re always guaranteed that the device WILL continue to work forever: it’s not a cloud product. It always run locally on the coordinator.
If you don’t want to set up a Zigbee network and want to stick to Wi-Fi, get Matter certified devices. Matter is a standard that will give you two guarantees:
- The device will ALWAYS have a local operation mode
- The device will be always manageable by at least 5 “fabrics” (clouds, if you will)
Matter, however, doesn’t guarantee you’ll be able to provision the device without the manufacturer’s app. If the device includes a QR code, you may be able to, but if it doesn’t, you’re going to have to follow a procedure just like we did with this guide, except a bit simpler (no need for key extraction as Matter guarantees vendors HAVE to share the keys)
- From my understanding, we can’t use this as this is a “white label” implementation of Tuya. Our devices talk to different tuya servers so our credentials won’t work here. Normally the step to fetch the keys won’t be needed, but for Ledvance devices, it is. ↩︎